Content Encryption
To make a post “private” you have several natively supported keys to add to the post’s front matter:
-
published: false—handled by Jekyll natively during its read phase—if a post has this set, Jekyll completely ignores the file, meaning no HTML is ever generated. -
hidden: true—handled by Minimal Mistakes natively to exclude the post from pagination loops and recent post lists. You can still visit the post via its link. -
search: false—handled by Minimal Mistakes to exclude a post from the search index. It only works when the search engine is Lunr.
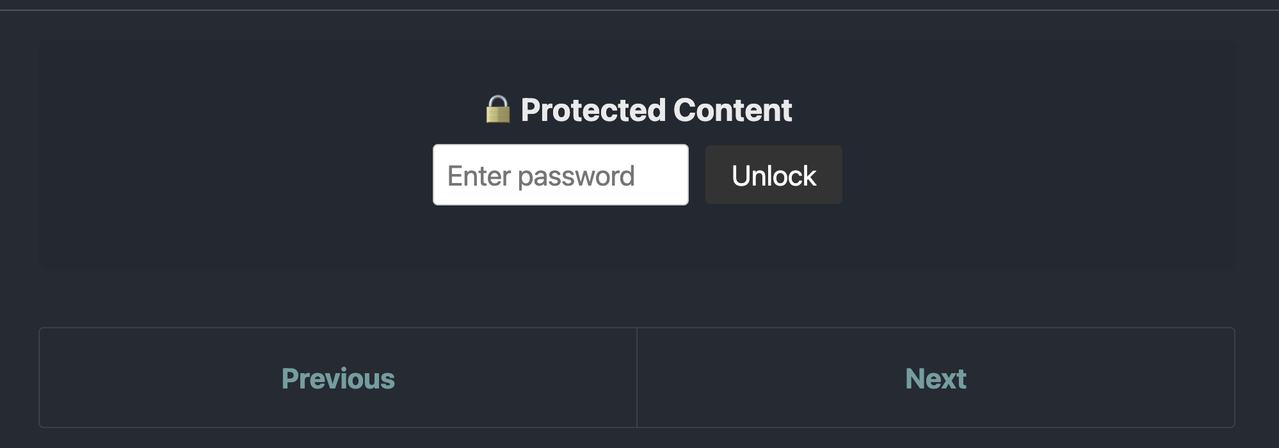
Now with minmal-mistakes-plus you can enable true private posts by using the encrypted: key in the front matter to control the encryption of a post. It takes the following values:
-
true: Encrypt everything of the post, including the title, TOC, tags, etc. -
false: No encryption, the default when unset. -
buttitle: Encrypt everything but the title.
Then you use a single, secure master password to decrypt the contents.
1. Use the Two-Repository Strategy (Free, GitHub-Only)
If you are on a free GitHub account but want to keep using GitHub Pages, you can separate your raw source files from your generated HTML using two repositories and GitHub Actions.
- Create Repo A (Private): This holds your Jekyll source files (Markdown, Org files,
_config.yml, etc.). - Create Repo B (Public): This will only hold the generated, static HTML site.
- Configure GitHub Actions in Repo A: You update your existing
.github/workflows/jekyll.ymlfile to build the site, but instead of deploying to the local repository, it pushes the compiled_sitefolder directly to Repo B.
To do this, you would use an action like peaceiris/actions-gh-pages in your workflow. It allows deploying to an external repository by using a Personal Access Token (PAT):
- name: Deploy to external public repository
  uses: peaceiris/actions-gh-pages@v3
  with:
    personal_token: $
    external_repository: your-username/your-public-repo-B
    publish_branch: main
    publish_dir: ./_site
This way, anyone looking at Repo B only sees the final compiled web pages, while your source files safely remain in your private Repo A.
1.1. The Local Workflow (Repo A)
Make sure you stop tracking the built site entirely in your source repository.
- Add
_site/to the.gitignorefile in Repo A. - When writing posts or testing configurations, simply run
bundle exec jekyll
    serve
on your computer. - You never run
git commitinside the_sitefolder. You only commit your source Markdown, Org files, and configurations to Repo A.
1.2. Create and serving Repo B
Now you can create a new repository (Repo B) on GitHub to host the static _site contents.
To serve your public site from Repo B using GitHub Pages, you need to configure it to act purely as a static file host. Since Repo A has already done the heavy lifting of building the Jekyll site, Repo B just needs to serve the finished HTML.
-
Ensure Repo B is Public
If you are on a free GitHub account, Repo B must be set to Public. Go to Settings > General in Repo B, scroll down to the “Danger Zone,” and ensure the repository visibility is public.
-
Configure GitHub Pages
- In Repo B, go to the Settings > Pages.
- Under the Build and deployment section, set the Source dropdown to Deploy from a branch.
- Under the Branch section, select the branch that your GitHub Action from Repo A is pushing to (usually main, master, or gh-pages).
- Select the
/ (root)folder. - Click Save.
-
Bypass GitHub’s Default Jekyll Build (Crucial)
By default, GitHub Pages assumes any repository is a raw Jekyll site and will try to build it again. Since your site is already compiled by Repo A, running it through Jekyll a second time can break your CSS, strip out folders that start with an underscore (like
_pageor_site), or cause build failures.To tell GitHub Pages to serve the files exactly as they are without processing them, you need a file named
.nojekyll(with no extension) in the root of Repo B.If you are using the
peaceiris/actions-gh-pagesaction in Repo A (which we are using in the following step), the action automatically generates and includes the file for you by default, so you don’t need to do anything manually.If you are using a different deployment method, make sure your workflow in Repo A creates an empty
.nojekyllfile in the_sitedirectory before pushing it to Repo B. You can add a quick step in your workflow right before the deployment step:- name: Add .nojekyll file run: touch ./_site/.nojekyll -
Wait for the Deployment
Once you save the Pages settings, GitHub will trigger a very fast deployment (since it’s just copying static files). Within a minute or two, your site will be live at https://your-username.github.io/your-public-repo-B/ (or your custom domain, if you add one in the Pages settings).
1.3. The Deployment Bridge (GitHub Actions)
When you push your source code to the private Repo A, a GitHub Action spins up, builds the site in a clean cloud environment, and pushes the resulting HTML directly to Repo B.
To set this up:
-
Generate a Personal Access Token (PAT) in your GitHub Developer Settings with the repo scope checked.
I highly recommend creating a Fine-grained personal access token.
While the “Tokens (classic)” will absolutely work, they grant sweeping access to every repository in your account. If a classic token with the repo scope is ever compromised, the attacker has full control over all your code.
A fine-grained token allows you to restrict the token’s access strictly to Repo B (your public HTML repository) and limit it to only the specific permissions needed to push files.
Here is how to generate the fine-grained token for this exact deployment setup:
- Go to your GitHub Settings > Developer settings (at the very bottom) > Personal access tokens > Fine-grained tokens.
- Click the
Generate new tokenbutton. - Give your token a name (e.g., “Jekyll Deploy to Repo B”) and set an expiration date.
- Under Repository access, select
Only select repositories. In the dropdown that appears, find and select Repo B (your destination repository). - Scroll down to Permissions and click on
Add permissionsto expand it. FindContentsand change the access level to Read and write. (This is all the action needs to push your built_sitefiles). - Click
Generate tokenat the bottom of the page. - Copy the generated token immediately, as GitHub will only show it to you this one time.
- Go to the Settings of Repo A, navigate to Secrets and variables > Actions, and add a new repository secret. Name it
DEPLOY_PATand paste your token. -
In Repo A, update your
.github/workflows/jekyll.ymlfile to look like this:name: Deploy Jekyll site to Repo B on: push: branches: - master # Or main, depending on your default branch in Repo A jobs: build_and_deploy: runs-on: ubuntu-latest steps: - name: Checkout Source Code uses: actions/checkout@v4 - name: Setup Ruby uses: ruby/setup-ruby@v1 with: ruby-version: '3.1' bundler-cache: true - name: Build Site run: bundle exec jekyll build - name: Deploy to External Repository uses: peaceiris/actions-gh-pages@v3 with: personal_token: $ # Replace with actual Repo B name external_repository: your-username/Repo-B # Branch to push to in Repo B publish_branch: master publish_dir: ./_site # Ensures stale files in Repo B are deleted keep_files: false
The peaceiris/actions-gh-pages action automatically creates the .nojekyll file in Repo B, preventing GitHub Pages from trying to rebuild your already-built files.
Repo B’s history will strictly be clean, automated deployment commits, while Repo A retains your actual human commit history and draft iterations.
2. Use a single, secure master password
You will store the password as a GitHub Secret for your automated deployments, and pass it inline when testing locally.
-
Update the GitHub Action
First, go to your private repository settings on GitHub (Settings > Secrets and variables > Actions). Add a new Repository Secret named
MMP_PASSWORDand enter your master password.Then, update your workflow file to pass this secret into the build environment:
--- .github/workflows/jekyll.yml
+++ .github/workflows/jekyll.yml
@@ -25,2 +25,3 @@
         env:
           JEKYLL_ENV: production
+ MMP_PASSWORD: ${{ secrets.MMP_PASSWORD }}-
Local Usage
When you are writing locally and need to test an encrypted post, you simply pass the variable directly into your terminal command before serving:
MMP_PASSWORD="your_master_password" bundle exec jekyll serveIf you don’t want to type it every time, you can add to your
~/.zshrcor~/.bashrcfile:export MMP_PASSWORD="your_master_password"
3. Use in Front Matter
Now, you can define your visibility state across your Markdown or Org files effortlessly.
---
title: "My Post"
published: true
hidden: false
search: false
encrypted: true
---

Your content.